Component System
Catalog and manage all the physical pieces of your board game. The component system lets you define every card, token, die, board, and more, then use those definitions for cost budgeting, manufacturing, and realtime playtesting.
On This Page
- Component Types reference
- Deck & Stack Builder — group cards into decks and tokens into stacks
- Creating Components
- Managing Components
- Playtest Settings
- Cost Calculation
- Importing & Manufacturing
- Dextrous Import · The Game Crafter Import · Tabletop Simulator Import
Component Types
The app supports the full range of pieces: Cards, Decks, Tokens, Dice, Boards, Rulebooks, Coins, Bags, Packs, Spinners, Counters, Timers, and a catch-all "Other." For what each type does and the fields it offers, see the Component Types reference. A rulebook can be built straight from a PDF or written in Markdown.
Decks & Stacks
Group cards into decks and tokens into token stacks with the Deck & Stack Builder (the Decks & Stacks section on this page). Groupings are reusable and many-to-many: a single card can belong to several decks at once, with the component as the single source of truth. These are what load as decks and stacks in the playtest room. Imports can place a component into multiple decks/stacks automatically.
Creating Components
Components are created with the Component Wizard: open your project, click the Components tab, then Component Wizard. It's a step-by-step guided flow (choose a type, then fill in details, appearance, and behavior), with an Expand all fields toggle if you'd rather edit everything on one screen. Click Next through the steps and Save/Create at the end. You can also create pieces live in a playtest room: spawn a blank one from the Generic Objects panel and right-click → Save as New Component (in the piece's right-click menu).
Creating a Card Deck
- Open the Component Wizard: Components tab → Component Wizard.
- Choose "Card" as the type.
- Fill in details: name, quantity, optional size label, physical size.
- Add images: paste or pick front and back; a preview appears.
- Set appearance/playtest settings (optional), physical size, default rotation, colors, card mask.
- Save to create the component.
- Group them into a deck: cards belong to decks through the Deck & Stack Builder, or by selecting them on the Components page and using the Deck box in the bulk bar.
Tip
Making a whole deck from a folder of card images? Choose Bulk Cards instead of Card, it creates every card in one pass and can put them straight into a deck. See Component Types.
Creating Custom Dice
- Open the Component Wizard and choose "Dice", then a die size (d6, d8, d20, etc.).
- Select "Custom" style: this reveals the face image inputs.
- Name your die (e.g., "Resource Die").
- Upload face images: for a d6, upload 6 images (leave blank for blank faces).
- Set quantity and Save.
Creating a Rulebook
- Open the Component Wizard and choose "Rulebook", then name your book.
- Set physical size (e.g., 8.5 × 11 for Letter).
- Add pages: Cover, Setup, etc., clicking + Add Page for each.
- Save: creates one entry per page, grouped by book name.
Managing Components
Viewing
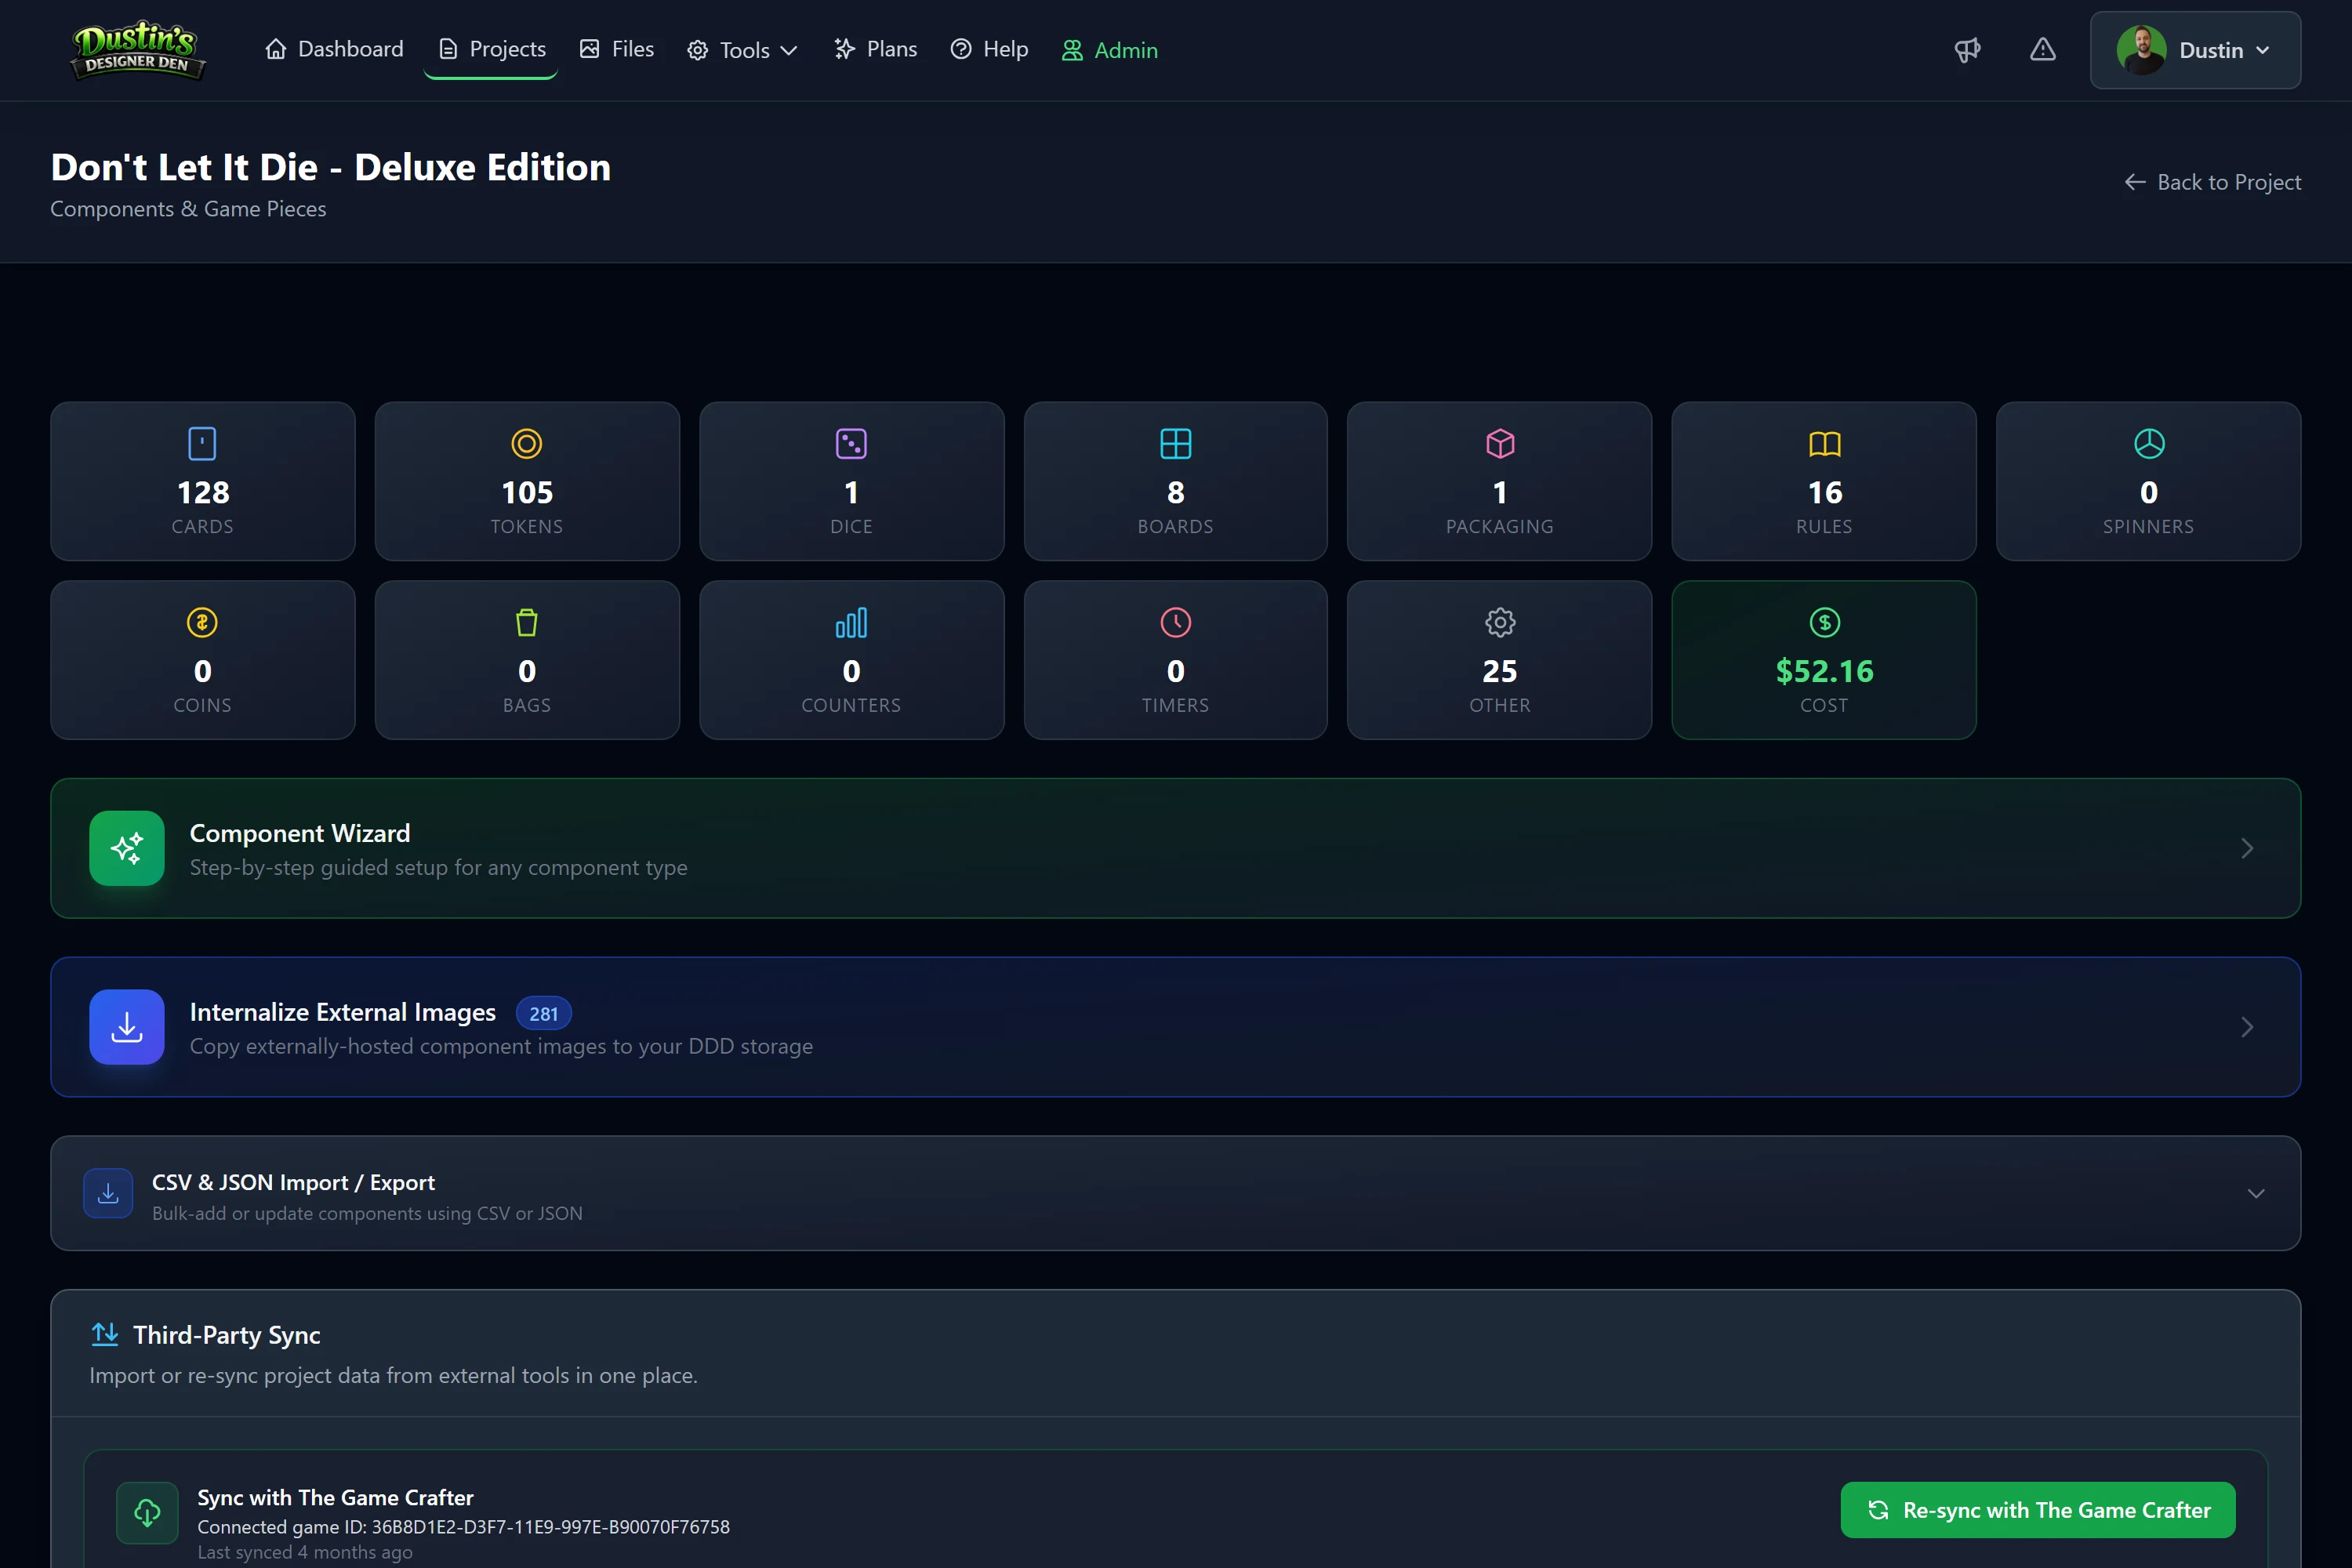
The Components page opens with a row of count tiles, one per type (cards, tokens, dice, boards and so on), then three panels: the Component Wizard, Internalize External Images and CSV & JSON Import / Export. Below them the components sit in collapsible sections by type, with Decks & Stacks first (the groups built in the Deck & Stack Builder, with + New Deck and + New Token Stack beside it), then Cards, Rulebooks, Tokens, Dice, Bags and the rest, each showing its count. Every row is the component's editor, described next, so nothing opens on a separate page.
Editing
Every row is an inline editor. The row itself holds the name, quantity, default rotation, physical size, shape and the front and back colors. Click Edit details to open the rest in three tabs, Appearance, Behavior and Advanced, and Save (or Save Changes at the bottom of the details) to write the blueprint. Copies already on a table keep what they had until you sync them, see Editing & Syncing Components.
Deleting
Use the trash icon (Delete) at the right of the row. The component is permanently removed (cannot be undone). Deleting a card removes only that specific card entry, not the entire deck.
Playtest Settings
Components have a Playtest Display Settings section in their edit modal that controls how they appear in realtime playtest rooms.
Physical Size
Sets the real-world dimensions, converted to pixels at 80 px/in on the tabletop. Set Physical Width + Physical Height in inches or mm. Example: a Poker card (2.5" × 3.5") renders as 200 × 280 px. When set, Physical Size takes precedence over Scale Override.
Scale Override (X / Y)
Multiplies the component's default display size; used when no Physical Size is set. Range 0.001 to 10.0 (default 1.0). X = width multiplier, Y = height multiplier.
Default Rotation
0°, 90°, 180°, or 270°: the initial rotation when a component is placed. Standard cards = 0°, panoramic cards = 90°, player mats = 90°.
Turning a Face Image
Two controls sit under the Front and Back previews in the inline editor, and in the playtest room's Edit Component… modal. Both rewrite the stored image in your file storage under the same address, so every copy of the component picks the change up, including pieces already on a table after Restore from Component. They only appear for artwork in your file storage; run Internalize External Images first for art hosted elsewhere.
- 90°, 180° and 270° under a face turn that face alone. 180° is the safe one: it keeps the face's proportions, and it is the fix for a back that reads upside down after a flip, which is how a Game Crafter custom-cut back drawn for a top-over-bottom flip comes in.
A quarter turn takes the piece's cut outline with it, turned in place, so the mask keeps its name and its place in your library and a turn taken back leaves it exactly as it was. If an outline cannot be turned exactly, the turn is refused before anything is rewritten and the piece is left as it was.
In the playtest room's Edit Component… modal every turn is pending: the previews show it straight away, Save Changes writes it to the stored images, and Cancel throws it away. A room never rewrites a project component on a button click. On the Components page a turn is written as you click it.
Default Rotation (above) is different again: it turns the whole piece on the table without touching the images.
Component Facing
0°, 90°, 180°, or 270°: defines which edge is considered "up," where name labels and UI icons anchor. Defaults to match Default Rotation.
How the Layers Stack
Before the individual controls, it helps to know how a piece is actually drawn, because almost every "why can't I see my image?" or "why is my token a grey square?" question comes down to the order.
A component face is built from four layers, bottom to top. Only ever one face at a time: the front settings when the piece is face-up, the back settings when it is face-down.
Top of the stack
Bottom of the stack
The same face, built up
The mask clips the whole stack, so it cuts the color fill, the artwork and the marks together rather than the artwork alone.
What opacity does to layer 1
Same component, same artwork. Only the color layer's opacity changed, which is why it is worth checking before the image when a piece looks wrong.
What Use Image as Mask does to layer 1
With it on there is no shape to fill: the artwork's own outline becomes the piece, so the color lays over the art as a tint. Its strength is that color's opacity.
1. Color and opacity (the bottom). Each face has its own color with its own 0-100% opacity slider. This is the fill, not a background you rarely see. It shows anywhere the layers above it do not cover: when no image is set at all, through the transparent parts of a PNG, and in the corners a mask cuts away. Set opacity to 0% and the fill disappears entirely, leaving only artwork. See Color & Opacity.
2. Image. The artwork for the face currently showing sits directly on the color. Because it sits on the color rather than replacing it, a piece of art with transparency is tinted by whatever color is underneath. A face with no image of its own falls back to showing just its color, which is the usual way to give a whole deck a uniform back.
3. Marks, labels and stickers. Anything drawn with the marker tool renders above the color and the image; text labels attached to the piece render above the marks; stickers render above both. All three ride the piece, so they move, rotate and scale with it, and each belongs to the face it was added on. A mark made on the front does not bleed through to the back.
4. Mask (the top). The mask is applied last and clips the whole stack into a silhouette: the color fill, the artwork and the marks together, not the artwork alone. That is why a mask can cut off part of a drawing, and why the color vanishes from the corners of a circular piece. Cards use a Card Shape Mask, tokens use a Token Shape. See Shapes & Masks.
Use Image as Mask changes step 4 rather than adding a fifth layer. Instead of clipping to a preset shape, the artwork's own transparency becomes the silhouette, so the piece is exactly the shape of the drawing. The color layer then tints the artwork instead of filling a shape behind it, which is why turning the opacity up on a masked token washes the art with color rather than putting a colored square behind it. It is the setting to reach for with meeples, standees and die-cut tokens.
Two consequences worth remembering:
- The color is never "behind" in the sense of hidden. If a piece looks wrong, check the opacity before you check the image. A 100% fill under artwork with soft edges will show as a halo.
- The mask is not just corner rounding. It changes the piece's outline everywhere it is drawn: the component preview, the Deck & Stack Builder, the room's sidebar, the drag preview and the table all clip a piece identically.
The same four layers are described from the project's point of view in How Your Data Fits Together.
Color & Opacity
Most types have a Front Color and Back Color, each a hex color with its own 0–100% opacity slider. Color and image work together on the same face:
- The color is the face's fill, and any image sits on top of it. So the color shows through wherever the image doesn't: when no image is set, in the transparent areas of a PNG, and in the corners a mask clips off.
- Opacity controls how strongly the color reads. At 0% the color is invisible — you see only the image (or a transparent piece). At 100% it's a solid fill. In between, it tints whatever is behind it.
- The front color/image show when the piece is face-up; the back color/image show when it's face-down. A piece with no back image falls back to its back color (handy for a uniform card back).
How this differs by type:
- Cards, Boards, Coins, Counters, Timers, Other: front/back color fills the face beneath the image as described above.
- Tokens: the color tints the token; with Use Image as Mask on (see below) it tints the masked silhouette instead of a square.
- Dice: no front/back color. Instead set Die Body Color and Font Color (the number color) — these apply to standard dice; custom dice show your face images.
- Bag: front color only (it tints the bag); there's no back face.
- Spinner / Rulebook: no color controls — a spinner's colors live on its individual sections, and a rulebook shows its page images.
Tip
Want art with no frame tint? Set opacity to 0%. Want a flat colored piece with no art? Leave the image blank and set opacity to 100%.
Shapes & Masks
Masks change a piece's silhouette — its outline — not just its corners.
- Card Mask (Cards): None (plain rounded rect), Square, Square Rounded, Rectangle, Rectangle Rounded, Circle, Diamond, Triangle, Triangle Rounded, Hex Pointy Top, Hex Flat Top. The card (image and color fill) is clipped to the chosen shape. Square, circle, diamond, triangle, and both hex orientations render in a square footprint — a Pointy-Top and a Flat-Top hex come out the same size, one is simply the other rotated 90°.
- Token Shape (Tokens): None, Rectangle, Rectangle Rounded, Square, Square Rounded, Circle, Triangle, Triangle Rounded, Hex (Pointy Top), Hex (Flat Top) — the same idea for tokens (hex tokens are square-footprint too). None is the default: the token is not clipped at all, so its artwork is drawn as it comes and keeps its own proportions. Pick a shape only when you want the piece cut to one. A token with no artwork and no shape is a plain colored square.
- Use Image as Mask (Tokens & Other), the Image Mask toggle on the row: instead of a geometric shape, use your own image's transparency as the silhouette. The rectangular frame and border are removed, the artwork's own outline becomes the piece, and the color setting becomes a tint over that shape. Great for irregular standees, meeples, or die-cut tokens.
A shape looks the same everywhere — the Deck & Stack Builder, the component preview, the playtest room's component sidebar, the drag preview, and the table all clip a piece to its mask identically, so what you see while designing is what lands on the table.
Boards are always rectangular, coins are round, and dice use the standard outline for their size — these aren't maskable.
Board Grid (Boards)
Give a board its own alignment grid, configured independently for the Front and Back face. In playtest, this grid overrides the table grid for pieces dropped on the board.
- Show grid / Snap pieces: independent toggles per face, show the grid, snap to it, or both. Both default off.
- Type: Square, Hex Flat, or Hex Pointy.
- Cell size: grid spacing in inches.
- Snap pieces to: Center (cell / hex centers) or Intersection (grid-line corners / hex vertices).
These settings can also be changed live from a board's right-click Board Grid panel in a playtest room (host / co-host only).
Snap Points
Click the component canvas to place snap point dots; drag to reposition. Each can have tags, an auto-rotation angle, and an "Override Deck/Stack" flag. Use the Front/Back toggle to place snap points on specific faces.
Snap Tags
The Snap Tags field (on the Advanced tab here, and on the wizard's Playtest Settings step) labels the piece for snap points: a snap point that carries tags only accepts pieces that share one of them. Cards, decks, tokens, boards and other pieces have the field. Type a tag and press Enter, or click Add. How matching works, and how to tag pieces live in a room, is in Snap Tags.
Marker Strokes
Strokes drawn on a piece with the room's marker tool (see Markers, Drawing & Labels) belong to that copy until you bake them into the blueprint: right-click the piece and choose Save State to Component, or open Edit Component… in the room, where the Appearance tab shows the strokes on the Front or Back preview and saves them with the component. Saved strokes then appear on every copy you spawn.
Stickers
Place image stickers on the front or back face of a component. Unlike session stickers (placed live in a room), stickers added here are permanent: they appear on every copy you spawn, and they travel with the blueprint. Use them for a set symbol, a faction crest, or an edition stamp. For placing stickers during a session, see Stickers.
Live Adjustment
While in a playtest room, right-click any piece and choose Edit Component to adjust these settings and save back to the database. Changes propagate to all copies on the table.
Cost Calculation
Each component can carry a cost per unit, which The Game Crafter import fills in from TGC's pricing and the API and CSV / JSON import can set. Multiplied by the quantity it gives the line cost, and the project's PDF bill of materials totals them, see Exports. An illustration:
| Component | Cost | Total |
|---|---|---|
| 54 Poker Cards | $0.12 each | $6.48 |
| 20 Wooden Tokens | $0.35 each | $7.00 |
| 6 Custom Dice | $1.50 each | $9.00 |
| 1 Game Board | $8.00 | $8.00 |
| 1 Rulebook (8 pages) | $2.00 | $2.00 |
| Total | $32.48 |
Importing & Manufacturing
Already managing your data elsewhere, or ready to make physical copies? Designer Den connects to outside tools so you don't retype anything or guess at costs:
- CSV & JSON Import / Export: bulk-create or bulk-update components from a spreadsheet, a JSON file, or a Google Sheet, and export what you already have in the same shape.
- Dextrous Import: sync component data from Dextrous automatically, with live updates pushed to an open playtest table.
- The Game Crafter Import: link components to print-on-demand products for live pricing, quantity discounts, and ordering.
Tips & Best Practices
- Organization: Use consistent naming, group with deck/book names, and add descriptions.
- Images: Use high-quality public URLs (300 DPI for print); test that a preview appears.
- Playtesting: Set scales before your first playtest (start with 1.0), then adjust live and save.
- Cost Management: Price components early; use The Game Crafter pricing as a baseline.
Related: Realtime Playtest · Help Center